Conversation Flows
Not every visitor needs a human. Some questions have a known answer. Some need billing. Some need engineering. Conversation Flows lets you build a visual decision tree that handles the triage, surfaces canned answers where possible, and routes the rest to the right team, or the right person, in Slack. Visitors get instant help. Your team only handles what actually needs a human.
What are Conversation Flows
A Conversation Flow is a decision tree you build per channel. When a visitor opens the chat widget on your site, the flow kicks in before any message reaches Slack. The visitor sees a series of prompts (your questions) with clickable options. Depending on what they pick, the flow either resolves the issue with a canned answer, or hands them off to the appropriate team or teammate.
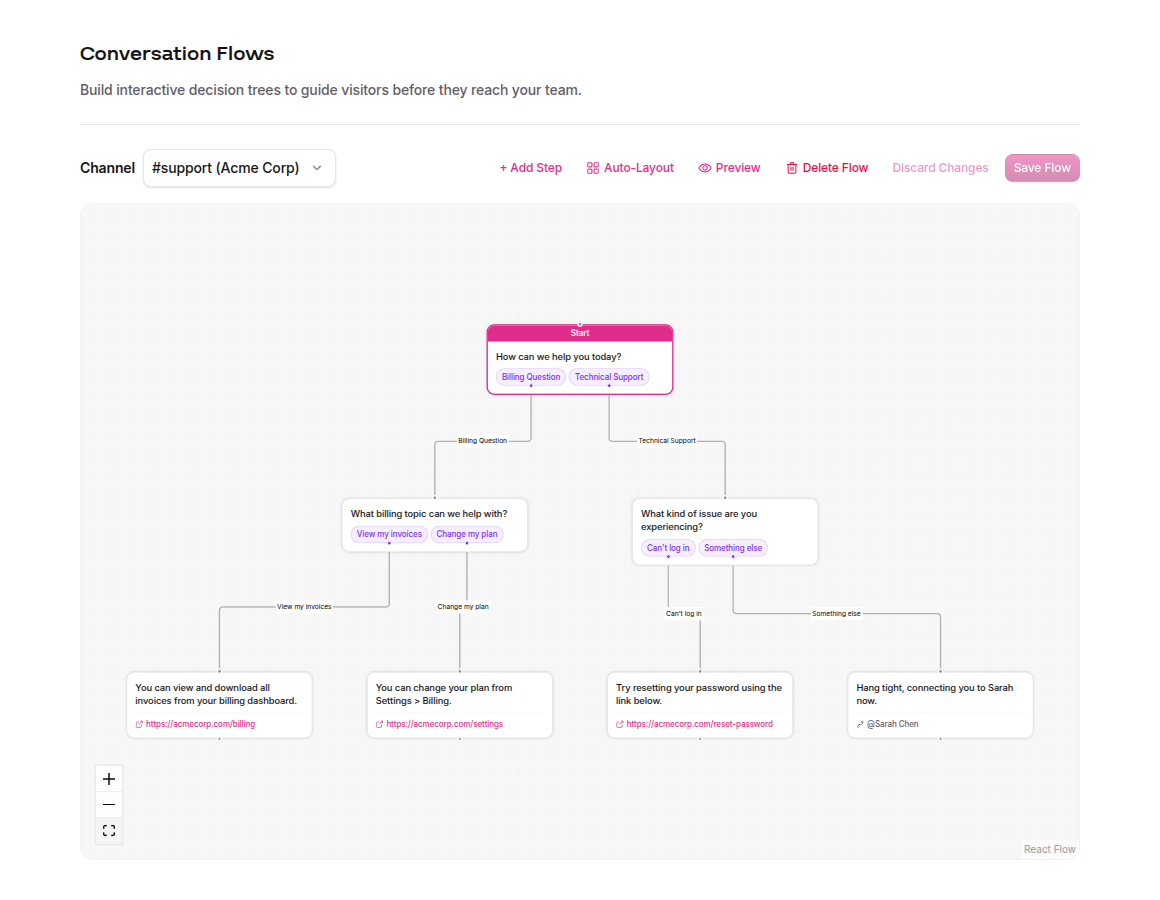
The builder is a visual canvas. Drag steps, connect them with options, and see the full tree at a glance. No code, no JSON, no config files.
Try it out
Here's a tiny Conversation Flow you can click through right on this page. It's the same component that powers the real widget on your site, just running against a mock decision tree instead of your Slack workspace. Pick a path and see what your visitors would see.
Creating a flow
- Click Conversation Flows in the sidebar.
- Pick a channel from the dropdown at the top. Only connected, enabled channels appear here. If you don't see any channels, head to Managing Channels to connect one first.
- Click Create First Step. This adds your first step, the starting question visitors see when they open the widget.
- Type your opening question (e.g., "How can we help you today?") and add options for the visitor to choose from.
- For each option, create a new step or link to an existing one. Click Create new step on an option to spin up a connected child step without leaving the editor. Build out the tree until every path ends in either a resolution or a handoff.
- Click Save Flow when you're done.
The first step you create is automatically marked as the Start step (you'll see a pink badge on it). This is the entry point for every visitor.
Step types
Every step in the tree is one of three types. The type determines what the visitor sees and what happens next.
- Question — Shows a message with clickable option buttons. Each option points to the next step. Use these to branch the tree: "Are you having a billing issue or a technical issue?"
- Resolution — Shows a message with an optional link. Terminal step, the visitor's issue is resolved without human intervention. Great for FAQs, password resets, and documentation links.
- Handoff — Routes the conversation to a team or a specific teammate. You assign a bucket (e.g., "sales", "support", "billing") or an
@mention(e.g.,@Jordan Rivera), and Ruby Relay connects the visitor to a human. Use this when automation won't cut it.
Editing steps
Click any step on the canvas to open the editor panel on the right side of the screen. Edits you make in the panel apply to the step immediately, so there's no "Apply Changes" button to hunt for. Your changes live in the builder until you're ready to publish them.
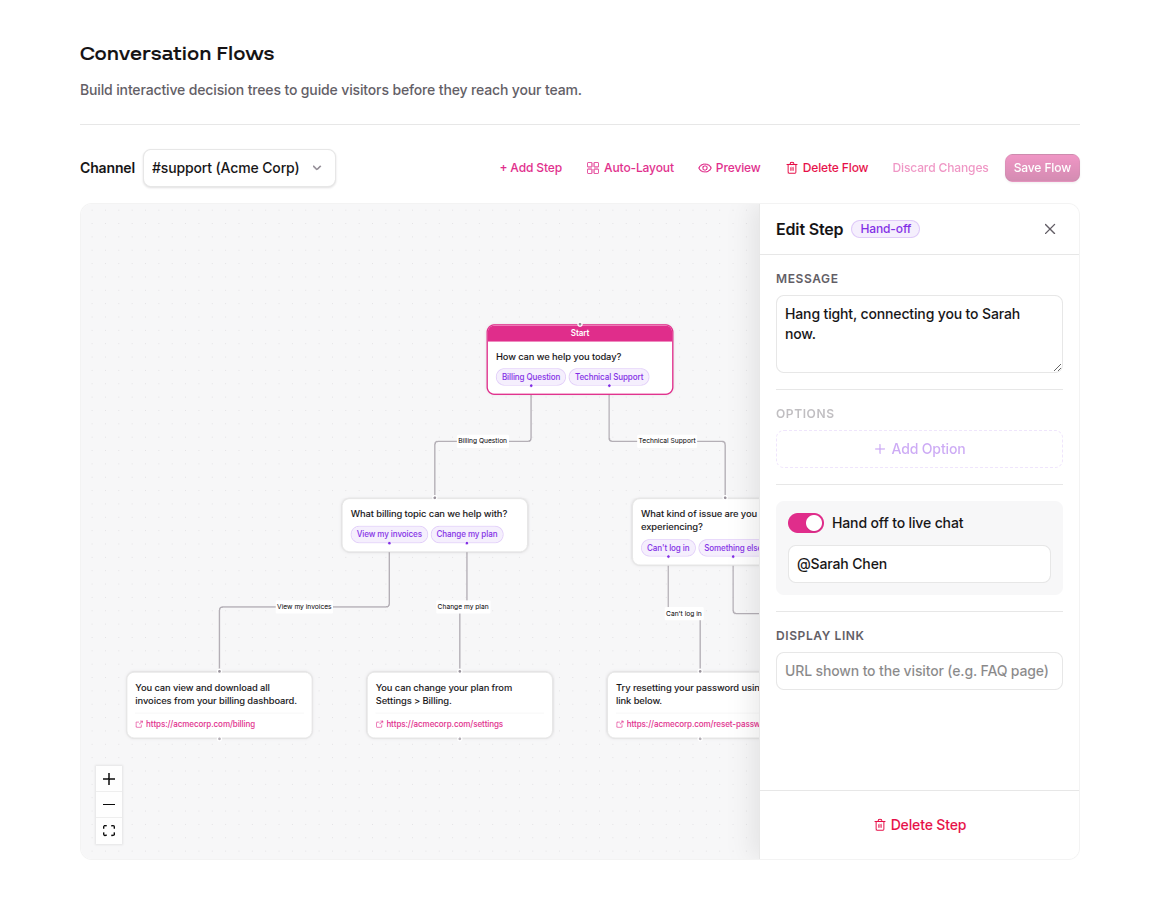
The editor panel lets you configure:
- Step message — The text the visitor sees. Keep it short and clear.
- Options (Question steps) — Each option has a label (what the visitor clicks) and a target (the next step in the tree). Hit Create new step on an option to spawn a child inline.
- Display link (Resolution steps) — An optional URL the visitor can click for more info (e.g., a billing dashboard link or a help article).
- Route to (Handoff steps) — The team, bucket, or person that receives the conversation. Type a bucket name like
billingor an@mentionlike@Sarah Chen. Autocomplete suggests buckets you've used elsewhere in the tree. - Hand-off toggle — Converts a question step into a handoff (or vice versa) without recreating it.
The toolbar at the top gives you Add Step (creates a new unconnected step), Auto-Layout (re-arranges everything neatly), Discard Changes (reverts to the last saved version), and Save Flow. Save Flow stays disabled until you have unsaved changes, and it won't let you publish a tree with validation errors. Fix the red-highlighted steps and the button comes back to life.
Routing to specific people
Handoff steps don't have to go to a generic bucket. If your team is small, or if a particular question should always land with a particular teammate, you can route the handoff directly to them with an @mention. Type their Slack handle or display name in the Route to field, prefixed with @:
@jordan- by handle@Jordan Rivera- by display name
When a visitor reaches that handoff, Ruby Relay looks the person up in your connected Slack workspace and tags them in the initial thread message. They get a real ping, not a line of text in a channel. Team buckets still work great for "whoever is on shift" style routing; @mentions shine when a question needs a specific human.
What happens if the handle is wrong?
If Ruby Relay can't find a user matching the name, or the match is ambiguous, the literal text is posted instead (so you won't lose the thread, you'll just see@Jordan Riveraas plain text rather than a clickable tag). Double-check spelling and that the person is actually in your workspace.
Preview your flow live
You don't have to ship a flow to your site to see what it feels like. Click the Preview button (eye icon) in the builder toolbar and Ruby Relay pops open a live simulation of the widget right next to your tree. It's the same component your visitors see, running your current draft against the workspace's saved widget theme.
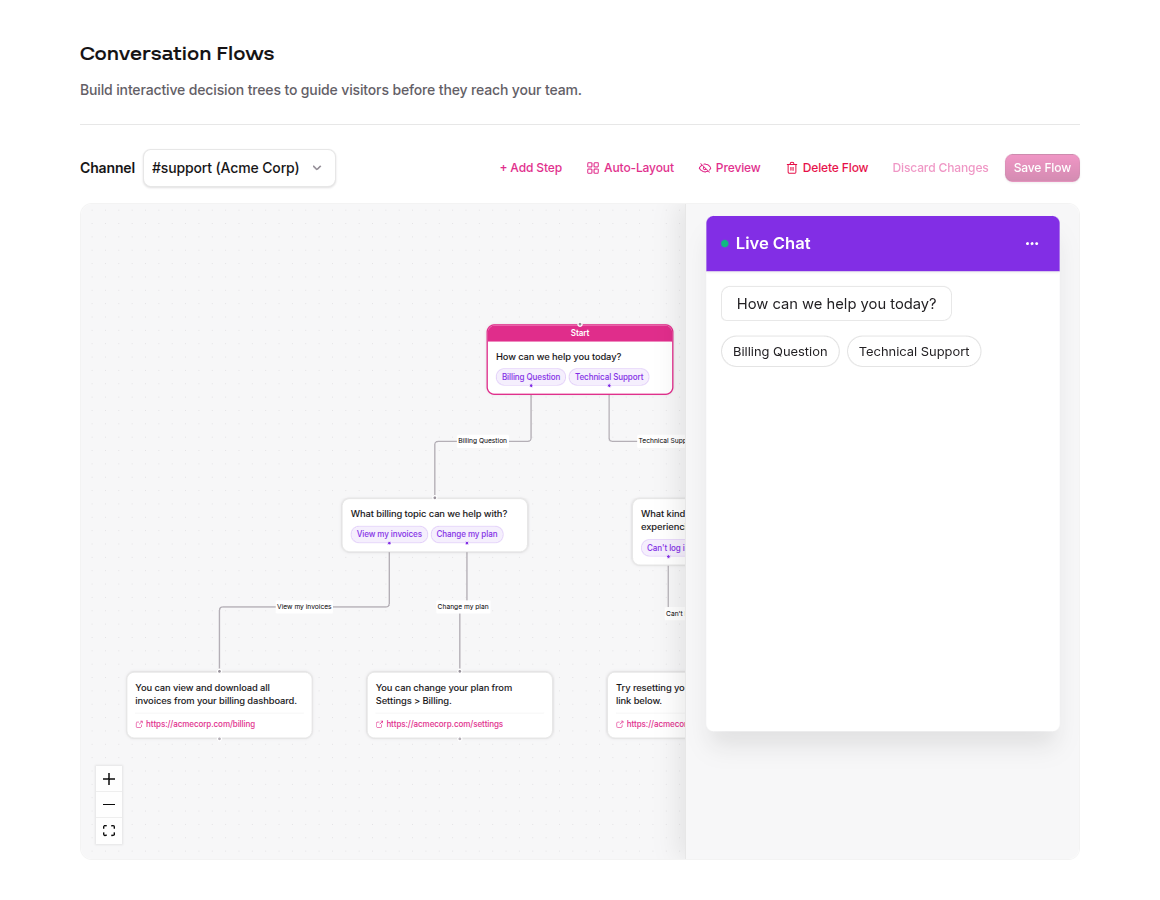
Walk through the flow the way a visitor would. Click options, hit dead-ends, find the point where your copy trips over itself. When you spot something to fix, click the step on the canvas to jump into the editor, tweak it, and the preview updates immediately. If the tree has validation errors, the preview lets you know which steps are broken so you can fix them before saving.
Deleting a flow
Want to start over, or retire a flow that's no longer serving you? Click Delete Flow in the builder toolbar (the red trash icon, next to Preview). A confirmation modal asks you to confirm before anything is removed, because this one isn't easily undone.
Once the flow is deleted, visitors on that channel stop seeing the decision tree entirely. Their messages go straight to Slack as normal. You can build a new flow on the same channel any time; deletion is per-channel, so other channels keep their trees.
Per-channel flows
Each channel can have its own flow. Use the channel dropdown at the top of the Conversation Flows page to switch between them. This is useful when different parts of your site serve different audiences:
- Support channel - Flow starts with "billing vs. technical" triage.
- Sales channel - Flow asks about company size and use case, then hands off to a sales rep.
- General channel - Simple FAQ tree that resolves most questions without a human.
If you switch channels with unsaved changes, a confirmation dialog warns you before discarding them.
Best practices
- Keep trees shallow. Three to four levels deep, max. Visitors abandon long funnels. If your tree is deeper than four steps, consider restructuring with broader top-level categories.
- Start broad, get specific. Open with two or three high-level categories (billing, technical, sales), then narrow from there. Don't front-load with ten options.
- Use resolutions for FAQs. Common questions like "where's my invoice" or "how do I reset my password" should resolve without a human. Link to your help docs or dashboard.
- Always include a handoff escape. Every branch should eventually reach a handoff option so visitors can talk to a person if the automated path doesn't help.
- Mix buckets and @mentions. Use buckets for high-volume categories (whichever teammate is on shift) and
@mentionsfor the questions where one specific person is always the right answer. - Test in the preview panel, then test for real. Click through the flow in the Preview panel first, then open your actual site and try it the way a real visitor would. If something feels confusing or slow, your visitors will feel it too.
For channel setup and management, see Managing Channels.
Plan availability
Conversation Flows is available on Growth and Scale plans. If you're on a Starter plan, the Conversation Flows page shows an upgrade prompt instead of the builder.
If you built flows while on Growth and later downgraded to Starter, your trees are preserved but read-only. Upgrade again and they're right where you left them. See Account & Billing for plan details and how to upgrade.