
Managing Channels
Stay in control. As your team grows or you add more sites, you'll want conversations going to the right channels. Here's how to keep things organized.
Dashboard overview
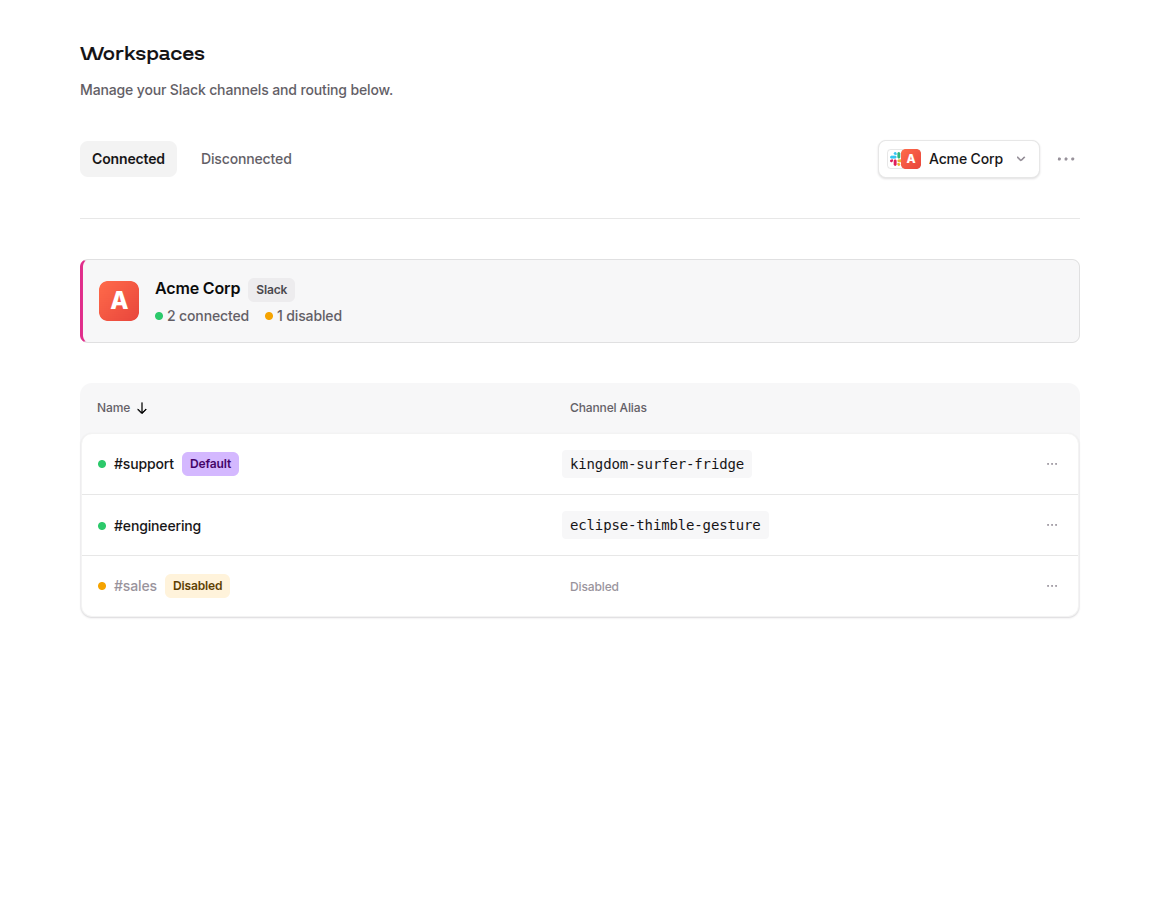
The Workspaces page in your dashboard shows every connected channel at a glance: workspace name, channel name, connection status (green = connected, yellow = disabled, gray = disconnected), and each channel's channel alias, a stable handle you can use to route a widget at that specific channel.
From this view you can connect new channels, disconnect old ones, or copy a channel's alias for your next embed. Think of the Workspaces page as mission control for your Slack connections.
Adding and removing channels
Adding a channel
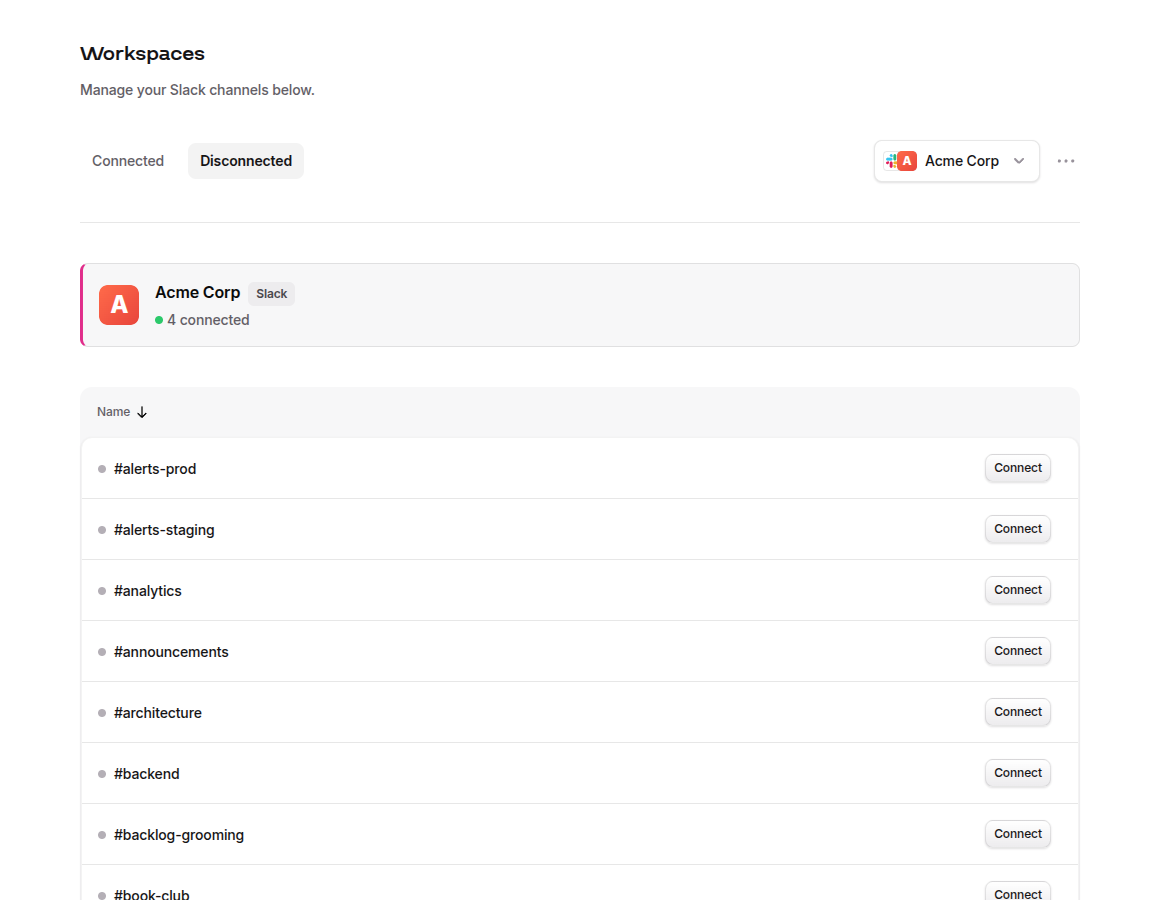
- Go to Workspaces in your dashboard.
- Click the Disconnected tab.
- Click Connect on the desired channel.
Removing a channel
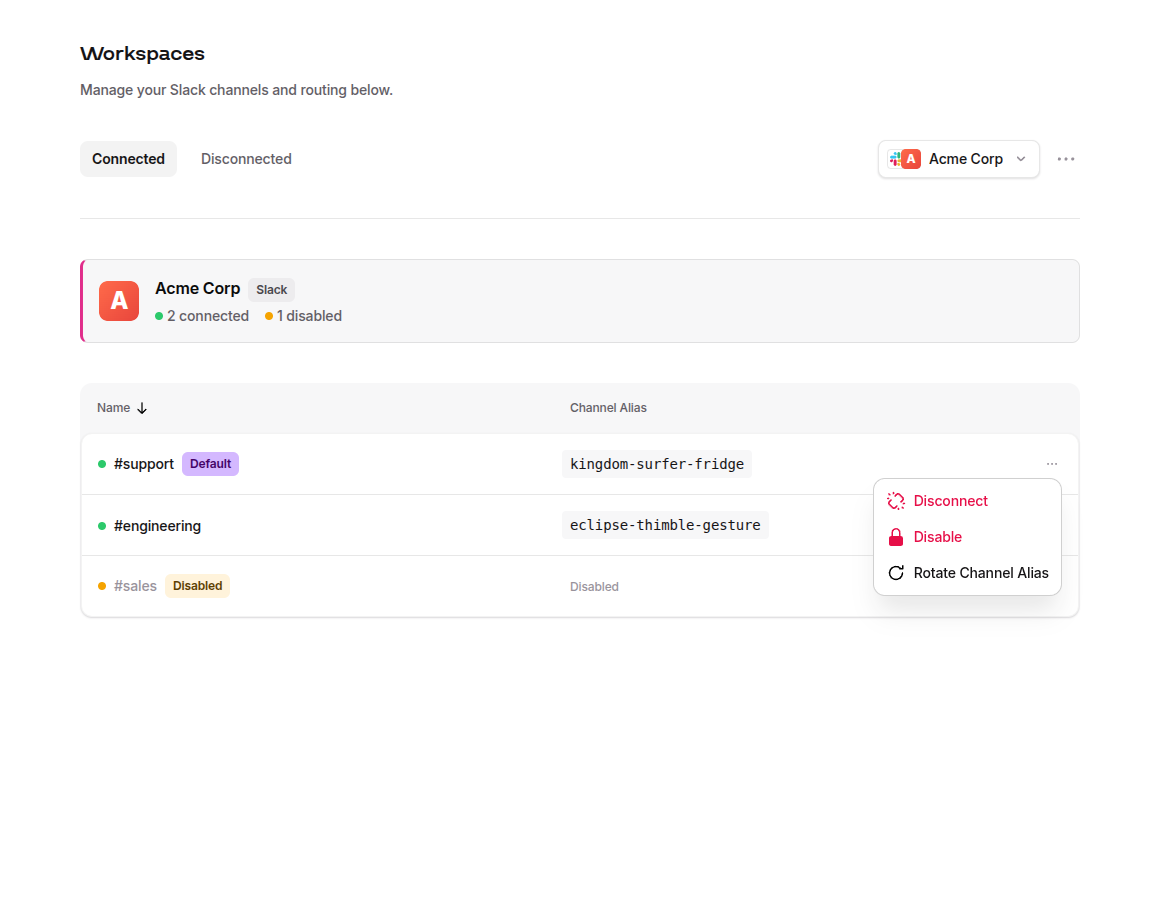
- Click the menu icon (three dots) on a connected channel.
- Select Disconnect.
- Confirm the disconnection. Any widget that was routed to that channel automatically falls back to your workspace's default channel. If it was your only enabled channel, delivery pauses until you connect or enable another.
Enabling and disabling channels
Sometimes you want to pause message delivery on a channel without fully disconnecting it. Disabling a channel keeps the connection intact but stops all message flow, so no visitor messages are relayed to Slack and no Slack replies reach the widget.
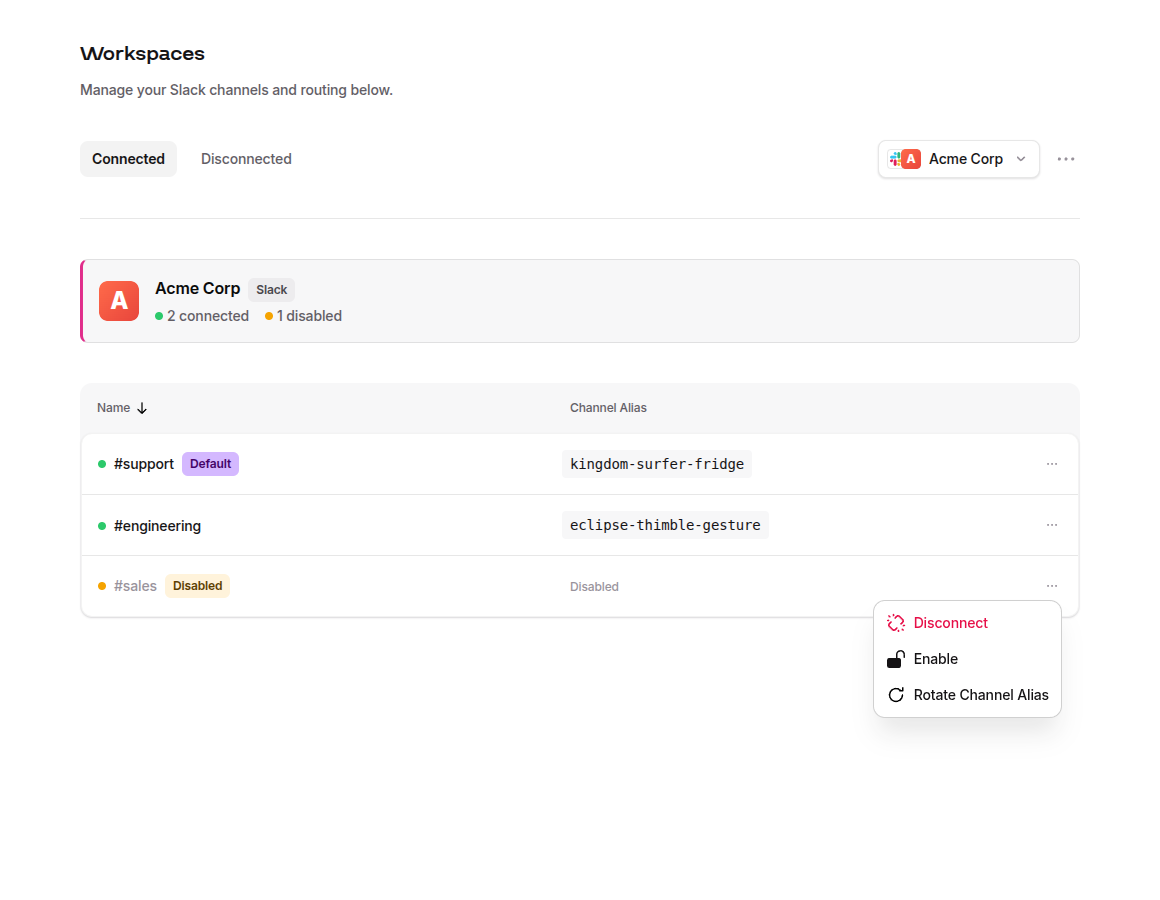
- Click the menu icon (three dots) on a connected channel.
- Select Disable.
- The channel stays in your Connected list but message delivery is paused. To resume, open the same menu and select Enable.
This is useful when you want to:
- Temporarily pause a channel during maintenance or off-hours without losing the connection or its channel alias.
- Manage plan limits by selectively enabling only the channels you're actively using, while keeping others ready to go.
A disabled channel is skipped by routing: any widget pointed at it (by alias or as the default) quietly falls back to your next enabled channel, so visitors never hit a dead end.
The difference from disconnecting: disabling keeps the channel and its alias in place so you can flip it back on instantly. Disconnecting fully removes the channel, and you'd need to reconnect it from the Disconnected tab.
You can also disable and enable at the workspace level via the workspace menu (three dots next to the workspace dropdown). This works the same way but affects all channels in that workspace at once.
Re-installing Ruby Relay
Sometimes a Slack workspace needs a fresh handshake. Maybe an admin uninstalled the Ruby Relay app by accident, your Slack admin rotated something on their end, or you're seeing "token expired" errors in the dashboard. Ruby Relay has a one-click fix: the Re-install Ruby Relay action.
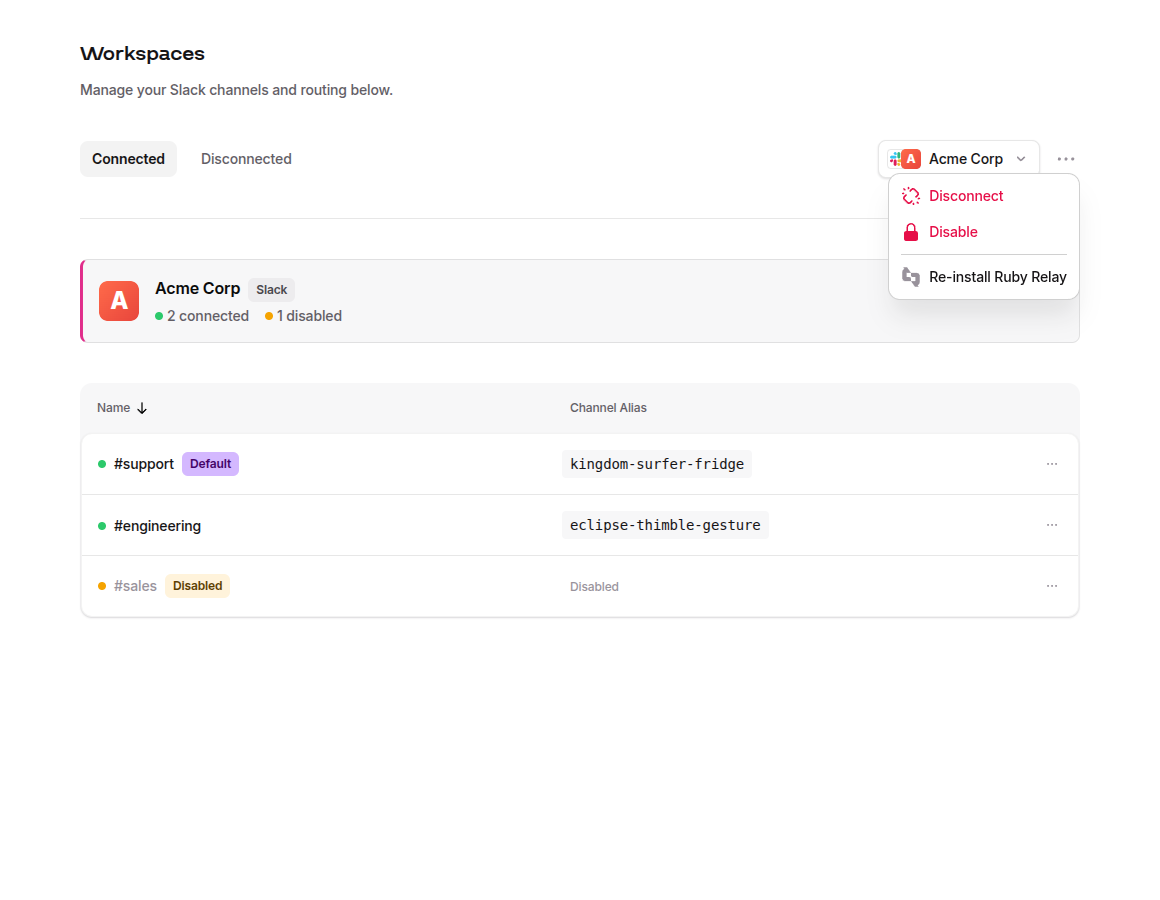
- Head to Workspaces in your dashboard and pick the affected workspace from the selector at the top.
- Click the three-dot button next to the workspace dropdown to open the workspace actions menu.
- Choose Re-install Ruby Relay. Slack's OAuth approval screen opens in a popup.
- Approve the permissions. Ruby Relay refreshes the workspace token behind the scenes. Your workspace keeps the same API key and channel aliases, so there's nothing to update in your embeds. No code changes, no redeploys.
Re-installing doesn't disturb your flows, channels, or saved widget defaults. Only the underlying Slack credentials change. If you're still hitting issues afterward, the full Troubleshooting guide has more fallback options.
API key and channel routing
Your workspace has one publishable API key (it looks like key-3f2a…), and you embed that same key everywhere. You'll find it on the Widget Configuration page's Embed Code tab. The key identifies your workspace. Which channel a conversation goes to comes down to a short, fixed set of rules, applied the same way every time.
How Ruby Relay picks a channel
For each new conversation, Ruby Relay checks the following in order and uses the first one that applies:
- The embed's
channelfield, when you set it to a channel alias that matches an enabled channel. - Your workspace's default channel (the first channel you connected, until you change it).
- The oldest enabled channel, as a last resort.
Unknown or disabled aliases don't throw an error; they just fall through to the next step. And if a workspace has no enabled channel at all (say you installed Ruby Relay but haven't invited the bot to a channel yet), the widget hides its launcher and re-checks every few minutes, so it appears on its own once a channel comes online. No redeploy required.
Channel aliases
A channel alias is a stable, readable handle like compass-panda-block that Ruby Relay mints for each channel when it joins. The words are random, not descriptive, so don't read anything into them. Aliases are unique within your workspace and safe to hard-code in an embed. They're purely a routing input you choose. To send a particular page or site to a particular channel, set the channel field in that embed:
window.RubyRelayWidget.init({apiKey: "YOUR_API_KEY",channel: "compass-panda-block",});
Copy a channel's alias from the Channel Alias column on the Workspaces page. You can swap one out any time (see Rotating a channel alias below).
A few ways teams use this:
- Multiple sites - Same workspace key on both; set
channelto your support channel's alias onacme.comand your feedback channel's alias onblog.acme.com. - Different departments - Point your pricing page at the sales channel's alias and your help center at the support channel's alias.
- Staging vs production - Give your dev environment the alias of a
#test-chatchannel so QA doesn't spam your live team.
Leave channel off and everything lands in your default channel, which you can re-point any time from the Workspaces page. For the full list of embed options, see Customizing Your Widget.
Your default channel
Your default channel is where conversations land when an embed doesn't name a specific channel. For most sites, that's all of them. The first channel you connect becomes the default automatically, and it's marked with a Default badge on the Workspaces page so you always know where unrouted chats go.
The default also doubles as a safety net: if an embed points at an alias that's been disabled, removed, or mistyped, Ruby Relay quietly sends the conversation to your default channel instead of dropping it.
To change which channel is the default:
- Open the Workspaces page and pick the workspace.
- Click the three-dot menu on the channel you'd like to promote.
- Choose Make Default. The badge moves over, and new conversations without a channel alias start landing there right away. No code changes needed.
If your default channel is ever disabled or disconnected, Ruby Relay falls back to your oldest still-enabled channel and shows a heads-up banner on the Workspaces page so you can pick a new default.
Rotating a channel alias
A channel alias is safe to put in your public embed code, but if one ever ends up somewhere you'd rather it didn't, or you simply want a fresh one, you can rotate it. Rotating swaps the alias for a brand-new one and retires the old.
- On the Workspaces page, find the channel.
- Open its three-dot menu and choose Rotate Channel Alias.
The old alias stops working immediately, so update any embeds that used it with the new one (it shows up on the Workspaces page the moment you rotate). Until you do, any widget still pointing at the old alias quietly falls back to your default channel, so visitors are never left stranded.
Multi-workspace
Starter plans include 1 workspace with up to 3 channels. Growth plans support up to 3 workspaces and 10 channels. Scale plans get unlimited workspaces and channels. This is built for teams managing several properties:
- Each client gets their own workspace connection, with its own API key.
- Each client's site embeds the API key for their workspace, so conversations land in the right Slack automatically.
- Within a client's workspace, split traffic across channels with the
channelalias field, no extra keys to juggle. - You manage everything from a single Ruby Relay dashboard.
Best practices
- Name channels clearly. Use a consistent pattern like
#rr-sitenameor#live-chat-clientnameso they're easy to find in Slack. - Set up notifications. The dedicated channel should notify on all messages so your team doesn't miss live visitors.
- Audit quarterly. Remove channels for sites you no longer manage. Clean dashboards make for calm teams.
- Use staging channels during development. Don't test against production channels. Your team will thank you.
For initial setup instructions, see Connecting Slack.