
Identity Verification
When a returning visitor opens the chat, Ruby Relay can show them their full conversation history: active chats they can pick right back up where they left off, and resolved ones they can look back over. To keep those conversation histories from ever reaching the wrong person, Ruby Relay first needs proof that the visitor really is who they say they are. That's what identity verification is: your backend signs the visitor's ID with a secret only your server knows, and the widget hands that signature to Ruby Relay. No valid signature, no history.
What it does
Without identity verification, anyone who knew (or guessed) another person's email could type it into a widget config and read that person's support history. The widget signing key closes that hole. It's a per-workspace HMAC secret. Your backend uses it to sign each visitor's identity into a short, time-stamped token. Ruby Relay recomputes the same token with its copy of the key, and only serves history when the two match.
It's the same model other support apps call "Identity Verification" or "secure mode." The key lives on your server, the signing happens on your server, and the browser only ever sees the finished signature, never the secret.
When you need it
You need this only if both of these are true:
- You identify visitors to the widget with
clientIDorclientEmail(see Customizing Your Widget). - You want those visitors to load their Saved Conversations when they return.
If you don't pass an identity, or you don't care about history, you can skip this entirely. The widget works fine without it; new conversations still flow to Slack as always.
Plan required. The signing key only appears once Saved Conversations is enabled, which is a Growth and Scale feature. Without stored history there's nothing to gate, so the card stays hidden. See Account & Billing for plan details.
Prerequisites
Identity verification has one real requirement: a bit of backend (server-side) code. The signature is calculated on your own server with your secret signing key, never in the browser. That means the widget snippet can't do it alone, and a fully static site with no backend can't use this feature.
Don't worry: the code is short (just a handful of lines), and we include copy-paste examples for popular languages below. If you have a developer on hand, it's a quick job.
Get your signing key
First, enable Saved Conversations from the Billing page. Then head to the Widget Configuration page in your dashboard and open the Embed Code tab. Below the snippet you'll find the Identity Verification card. Expand it and your signing key is already there (it looks like wsk_d7c2c9c8-d8c2-4b5b-99c2-cceedac2ce81). Reveal it, copy it, and store it somewhere your backend can read it.
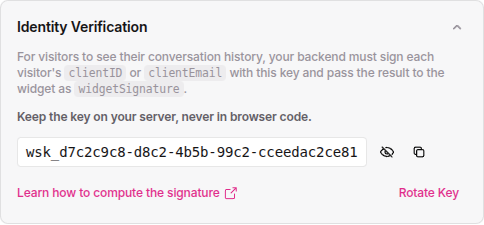
Keep it on your server. Anyone with this key can forge any visitor's identity. Never ship it to the browser, never commit it to a public repo, never paste it into the widget config. The widget only ever sees the finished signature, not the key.
How the signature works
A signature is an HMAC-SHA256 of the visitor's identity and a timestamp, keyed by your signing key. The recipe is short and the same in every language:
- Pick the identity. The widget config has two separate identity fields,
clientIDandclientEmail, and identifies a visitor by whichever one you set. Sign the one it will actually send:
| What you pass to the widget | identKind | identifier |
|---|---|---|
clientID | "uniqueID" | the clientID value |
clientEmail (and no clientID) | "email" | the email address |
If you pass both, the widget prefers clientID, so sign the clientID. Whatever you choose, the widget and your backend must agree, or the signature won't match.
- Build the signed string by joining the current Unix time (whole seconds), a literal
., theidentKind, a literal:, and theidentifier:For example:text{unixSeconds}.{identKind}:{identifier}1700000000.email:alice@example.com. Sign the identifier raw, never URL-encoded. - HMAC-SHA256 that string using your
wsk_…key as the secret (the literal key string, as bytes, not decoded from hex or base64). Encode the result as lowercase hex. - Format the token as
t=<unixSeconds>,v1=<hex>. That's the value you pass to the widget aswidgetSignature.
Ruby Relay accepts signatures within a 5-minute window of its own clock, so generate a fresh one each time you render the widget. Don't cache it for hours. On the first verified load the widget receives a 24-hour session token automatically and reuses it, so this signature only needs to be valid at page-load time. You don't manage the session yourself.
Compute the signature on your backend
Each function takes your signing key, the identKind, and the identifier, and returns the t=…,v1=… string. Pick your language:
import { createHmac } from "node:crypto";// identKind is "uniqueID" (when you pass clientID) or "email" (clientEmail).function widgetSignature(signingKey, identKind, identifier) {const t = Math.floor(Date.now() / 1000);const payload = t + "." + identKind + ":" + identifier;const v1 = createHmac("sha256", signingKey).update(payload).digest("hex");return "t=" + t + ",v1=" + v1;}// widgetSignature(process.env.RUBY_RELAY_SIGNING_KEY, "uniqueID", "user_123")
Pass it to the widget
Compute the signature on your server, render it into the page, and hand it to the widget as widgetSignature alongside the same identity you signed. With the script tag:
<script src="https://cdn.rubyrelay.com/widget.js" defer></script><script>window.RubyRelayWidget.init({apiKey: "YOUR_API_KEY",clientID: "user_123",// Rendered by your server, fresh on each page load:widgetSignature: "t=1700000000,v1=2f9b8c…d41c",});</script>
Or with the React component:
import { RubyRelayChat } from "ruby-relay-chat-widget";// `signature` comes from your backend (an API route, server component, etc.),// computed with the function above. Never compute it in the browser.export default function Support({ user, signature }) {return (<RubyRelayChatapiKey="YOUR_API_KEY"clientID={user.id}widgetSignature={signature}/>);}
That's it. The widget sends the signature with its first history request; Ruby Relay verifies it and loads the visitor's conversations. The widgetSignature field is also listed in the full config reference under Customizing Your Widget.
Rotating the key
If a key leaks, or you just rotate secrets on a schedule, open the Identity Verification card and click Rotate Key. A fresh wsk_… is generated and the old one stops working immediately for every channel in the workspace.
Because the change is instant, your visitors lose access to their history until your server starts signing with the new key. Roll the new value out to your backend first (or in the same deploy), then rotate, to keep the gap to zero.
Troubleshooting
History never loads (the request is rejected)
Three usual suspects: your server clock is off by more than 5 minutes, you signed a different identity than you passed the widget (signed the email but passed a clientID, or vice versa), or you URL-encoded the identifier before signing it. Sign the raw value and the same field the widget sends.
"Signature mismatch"
You're using the wrong key (did you rotate it recently?), your hex came out uppercase (it must be lowercase), or you hashed a JSON object instead of the exactt.identKind:identifierstring. Double-check the separators: a literal.then a literal:.
The Identity Verification card isn't in my dashboard
It only appears when Saved Conversations is enabled (Growth or Scale). Turn it on from the Billing page, then revisit the Embed Code tab.
Still stuck? The full Troubleshooting guide has more, or email support@rubyrelay.com and we'll dig in with you.